According to physics, power is the love child of force and velocity.
Mathematically it looks like this: power = force x velocity
Unlike strength, where velocity (and thus time) is a low priority, high power relies on the velocity piece of the equation. The rate of force development matters for power unlike with strength. I’ve seen plenty of slow people lift huge weights because, last time I checked, there isn’t a shot clock when you’re hitting a 1 rep max.
So, you can’t be powerful if you can’t generate velocity in a timely manner.
Think about some of the most powerful athletes on the planet. What’s the one thing they tend to all have in common…
Velocity.
They have the ability to go from 0-60 in the blink of an eye.
Go watch an NFL running back, middle linebacker, or strong safety and tell me you aren’t blown away by their combination of force and velocity.
I want the same thing for you. I want you to be both the Juggernaut and the Flash.
To train power, there are two main things you must do:
Move light loads at maximal velocities
Move moderate loads at moderate to high velocities.
Together, these include jumps, throws, sprints, and dynamic effort lifting.
Yes, the Olympic lifts can play a major role here as well, but I choose not to include them in my model. Over the years, I’ve found they don’t add anything beyond other methods besides loads of complexity. That’s not to say Olympic lifts aren’t fun or impressive, but if I can achieve the same outcome with simpler methods, I will.
The below graphic from Derek Hansen summarizes this point nicely.
Programming jumps, throws, sprints and dynamic effort lifting can be challenging, but learning how and when to do so can take both your power and athleticism to the next level.
Power Training Principles
1️⃣ The Force Velocity Curve, Power and Athleticism
I introduced the force-velocity curve back in the strength chapter, but this is where it really shines.
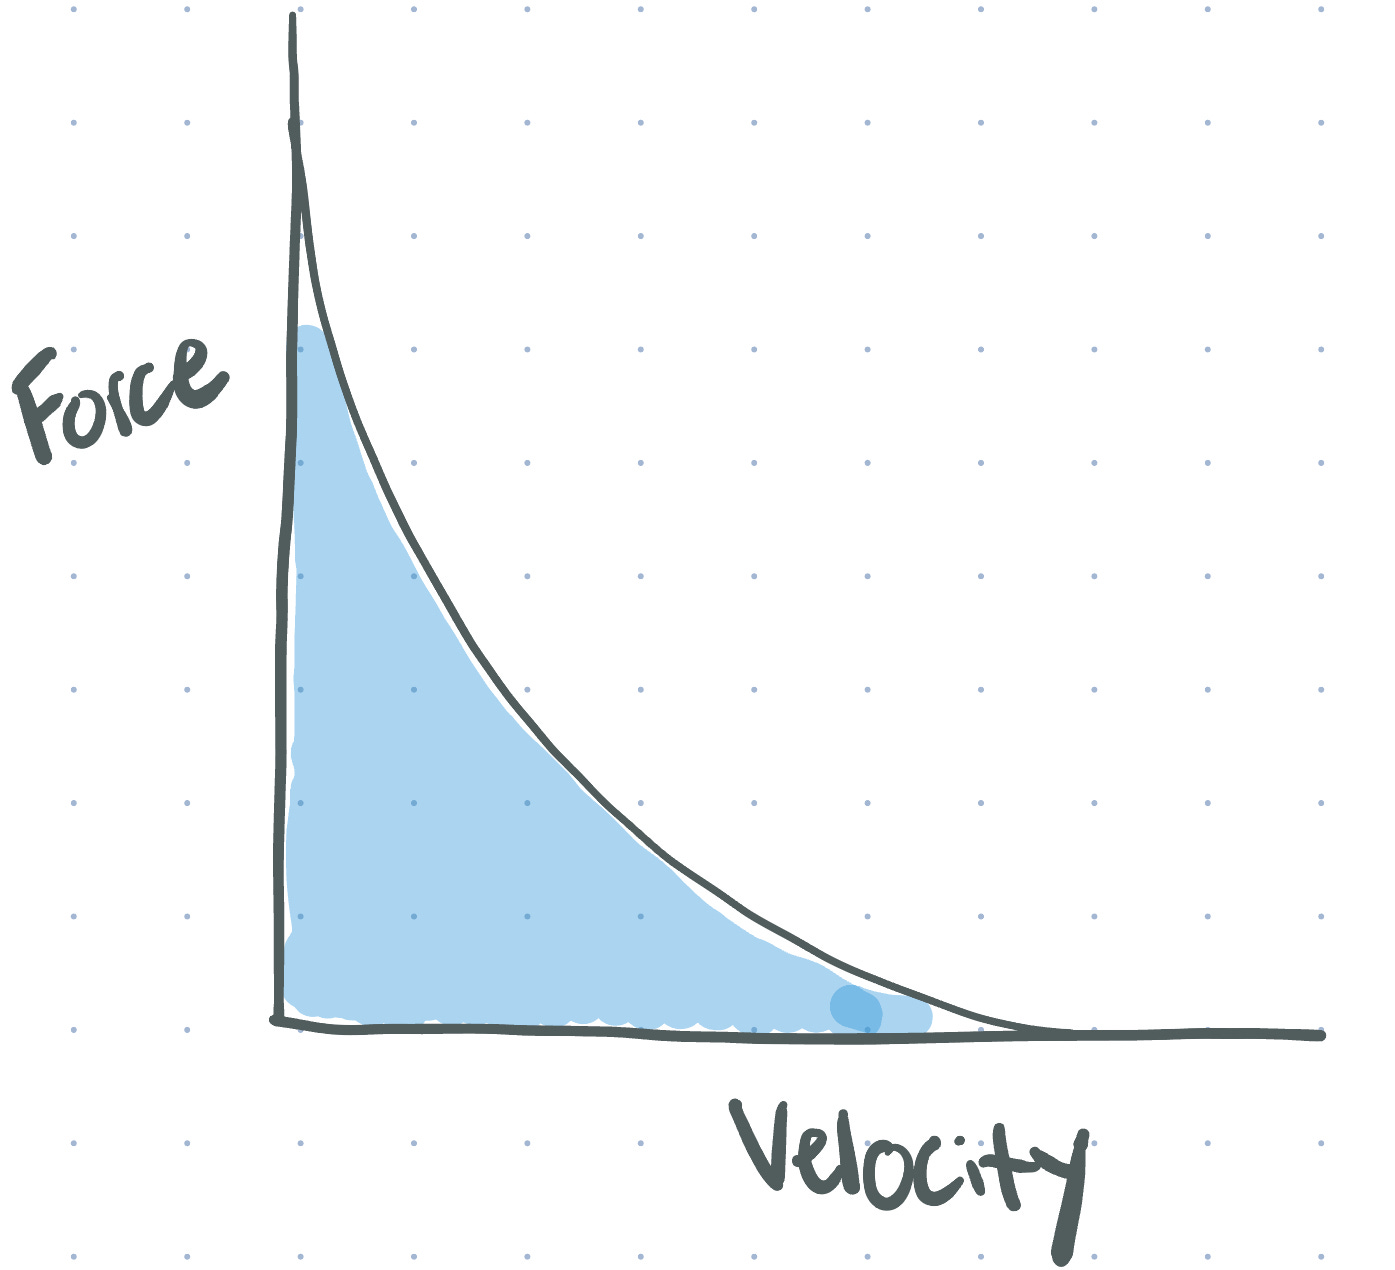
If you look below, you will see the concentric portion of the force-velocity curve with the area under the curve filled in and some labels to help you orient.
At the far-left end of the x-axis, you have max strength. Force is at its absolute peak while velocity is near zero. On the far-right end of the x-axis, you see the opposite – max speed. Force is low but velocity is at max.
I am happy to make the argument that the best athletes are the ones with the greatest area under the curve because they have the greatest potential to generate power. They are both strong and explosive.
This begs the question: how do you maximize the area under the curve?
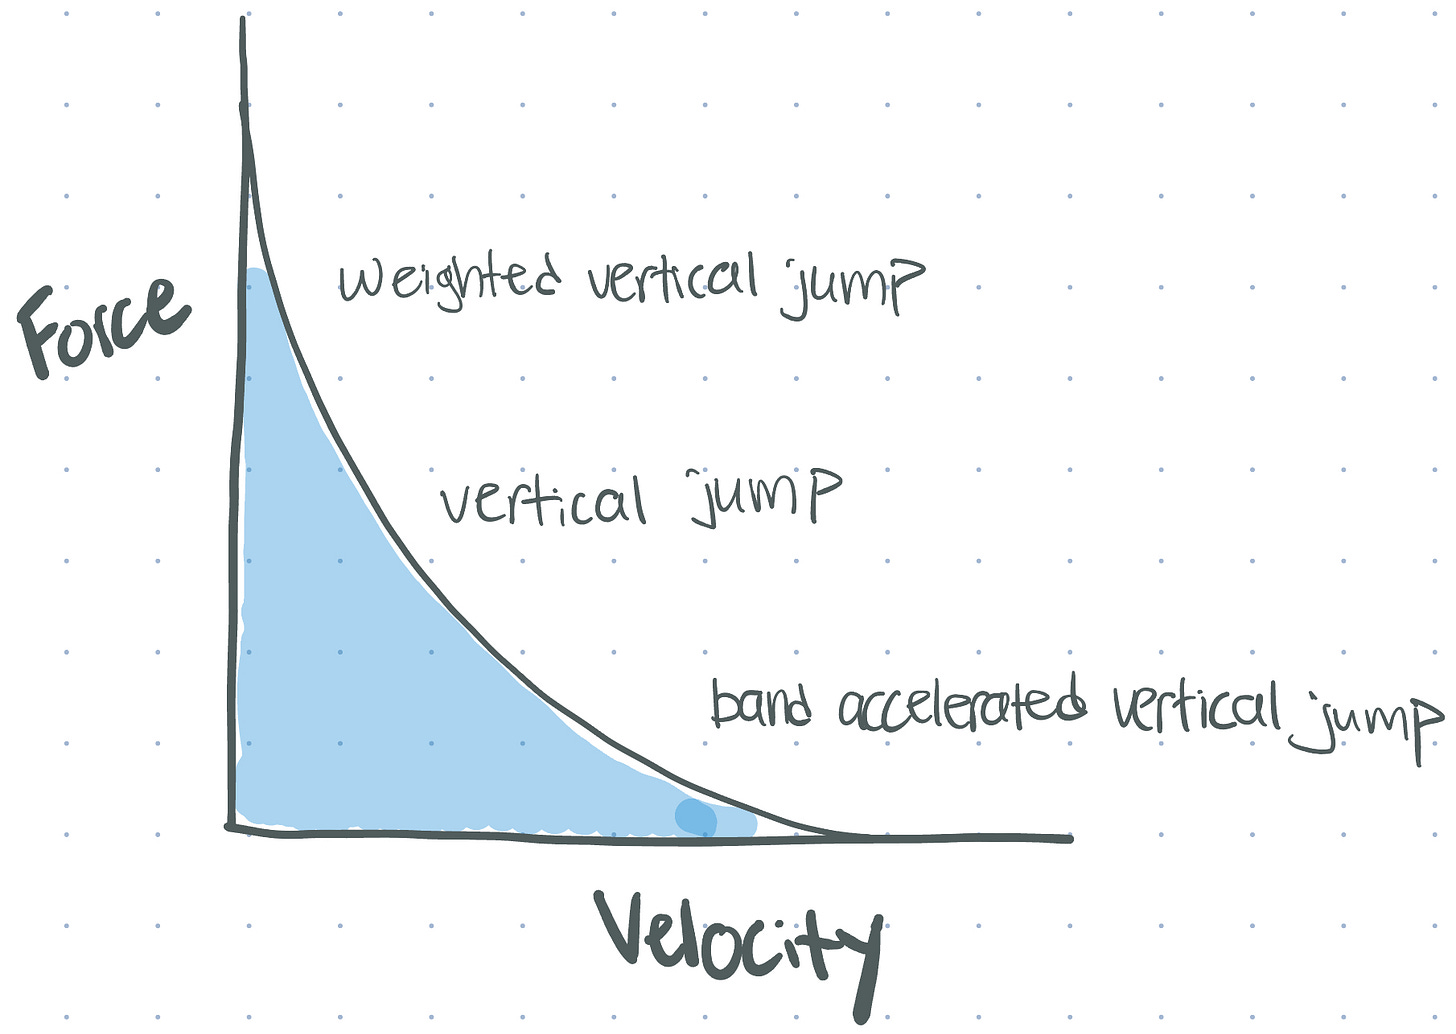
The simple answer is that you do things up and down the force-velocity curve. You do some activities that are force biased, some activities that are velocity biased and some that aren’t biased in any direction.
Let’s use a vertical jump as an example. Performing a vertical jump with a weight vest is force biased, performing a band accelerated vertical jump is velocity biased, and performing a normal bodyweight vertical jump is smack in the middle.
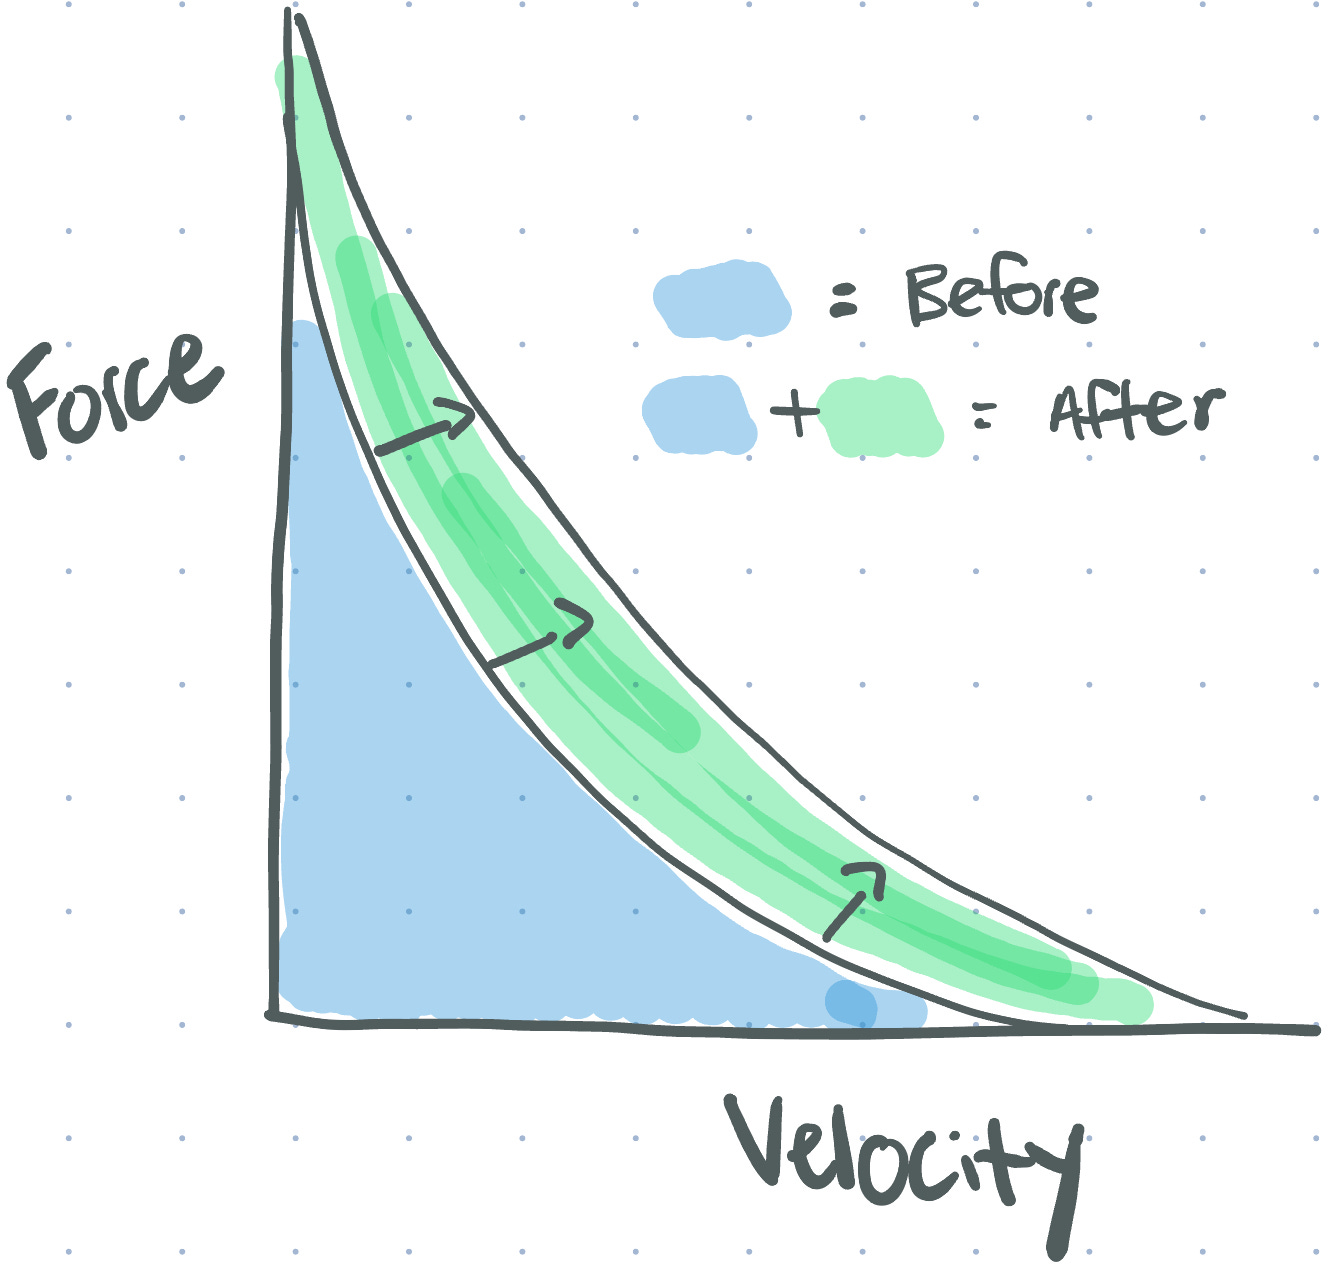
By working throughout the curve (we will talk more about how to do that throughout this chapter) you shift the curve out to the right, increase the area under the curve and leave yourself (or your athlete) with a more robust power profile.
However you decide to do it, always come back to the force-velocity curve when you want to train power. The curve, and understanding how to manipulate the curve, is the major principle of this chapter.1
2️⃣ Extensive vs. Intensive Methods
Extensive methods are low-intensity efforts performed at a high volume, while intensive methods are high-intensity efforts performed at a low volume.
Similar to the progression of volume and intensity from the strength chapter, you will progress from extensive to intensive methods over the course of a program. So once again, volume decreases over time as intensity increases.
The high-volume, low-intensity work sets the stage for the high-intensity work to come. For example, in phase 1 of a program, you may perform 4x10 per side of extensive unilateral hops, while in phase 3 of a program, you may perform 10x2 depth drop vertical jump for max height.
If you’re confused, here are a few ways in which an exercise can be manipulated to be extensive vs. intensive:
Position
How much force and velocity you can generate in a given position? For example, think about the difference between a tall kneeling chest pass and a rotational MB throw. The tall kneeling chest pass is positionally limited. There’s a low ceiling for power output, so it’s automatically slotted into an extensive protocol.
Intent
You can take just about any throw or jump and make it extensive by taking your foot off the gas and working at 60-70% effort. Consider the difference between these traveling heidens and these zig-zag bounds. The former is obviously more of an extensive method, while the latter is more intensive. And the distinction is made purely based on effort.
Extensive vs. Intensive Examples
Let’s examine how this works with a few different jumping and throwing protocols.
3️⃣ Load Manipulation - Overweight and Underweight
The addition or removal of load is another way to manipulate things.
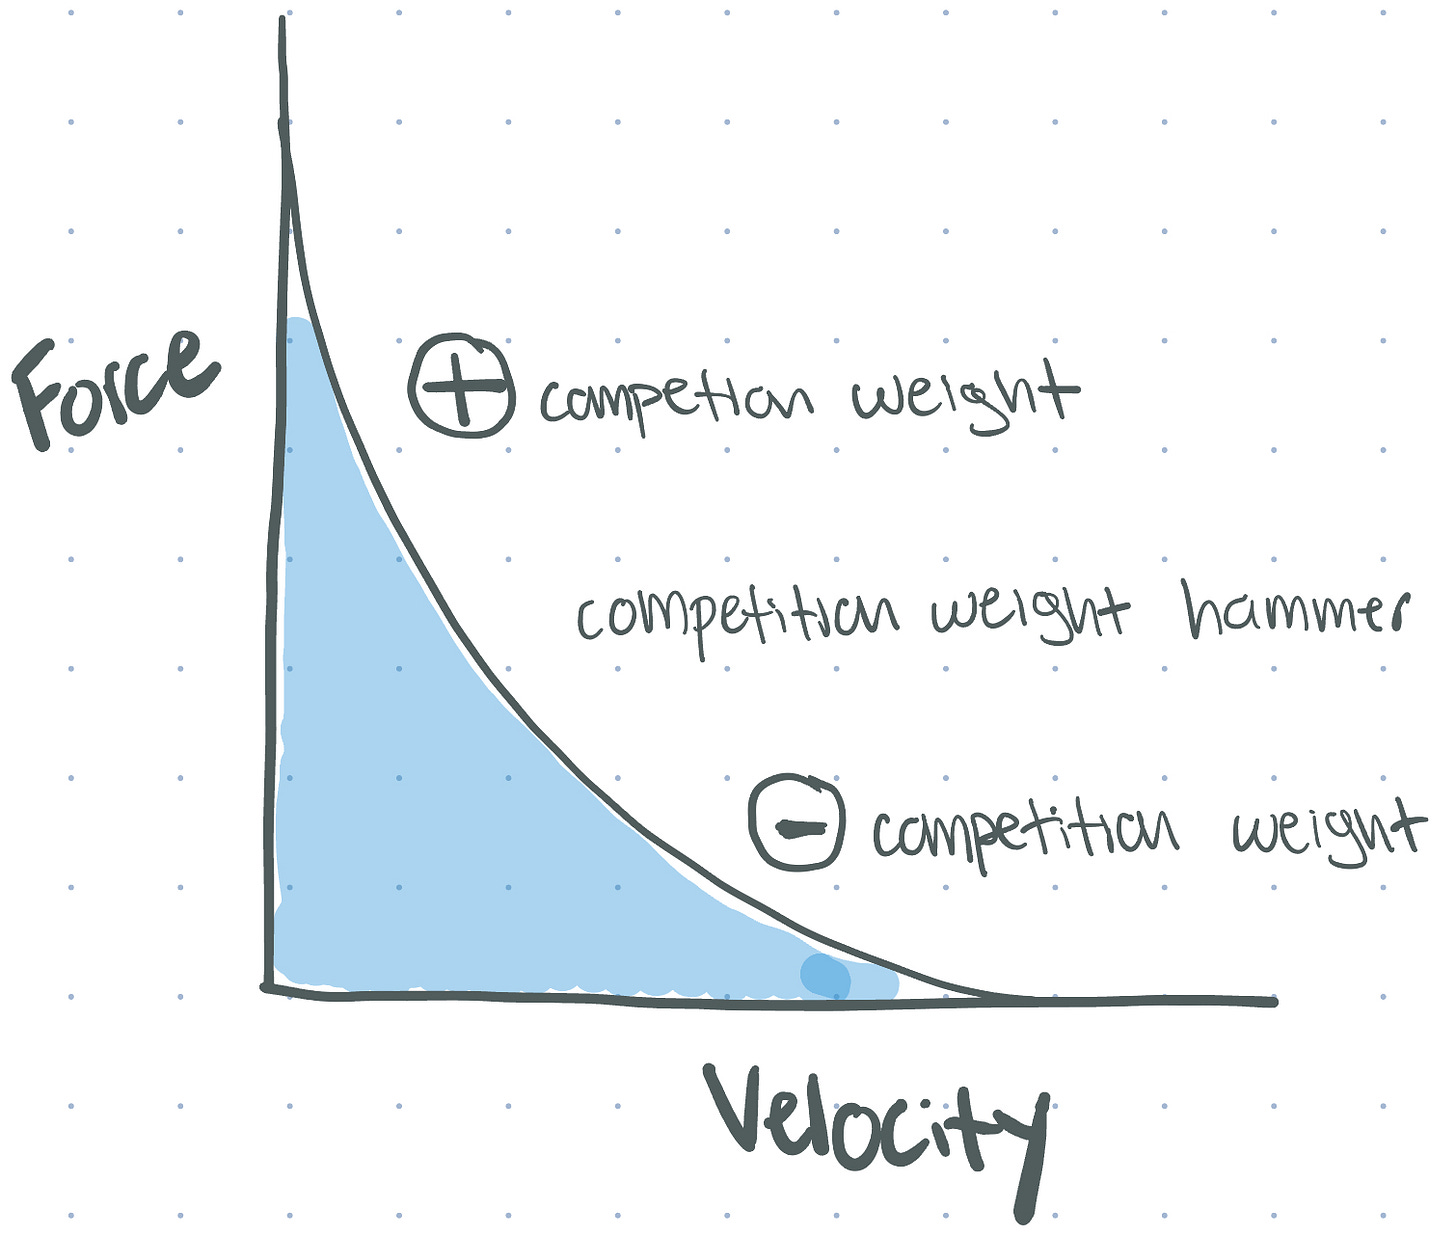
Think back to the force-velocity relationship, you can use the addition or reduction of load to prioritize force or velocity, respectively.
Dr. Anatoliy Bondarchuk’s work Transfer of Training in Sports is a great resource to read more about this, but the basic concept is this - if you’re a hammer thrower, would you only perform throws with the hammer you use on competition day, or would you perform throws with overweight and underweight hammers as well?
The answer is the latter. You will only get so far using the same load repeatedly. By using load above your competition weight, you preferentially develop force, while using load below your competition weight biases velocity.
Power is the product of force and velocity, so improving either component leads to greater power output.
Here’s what that looks like on the force-velocity curve:
Power Training Protocols
1️⃣ Programming Considerations for Jumps and Throws
There are many ways to approach programming jumps and throws over a training cycle.
Far too many to unpack in a single chapter.
Instead, I’m going to share 2 options with you that I’ve had tremendous success with over time. They may not be fancy, but they flat-out work again, and again, and again.
Your first option is to move down the force-velocity curve over time by going from force biased to velocity-biased jumps and throws.
Here are 2 examples of what that looks like:
Sample progression for a vertical jump
Sample progression for a MB throw
Your second option is to start on either side of the force-velocity curve and meet in the middle over time. This involves having a force-biased day and a velocity-biased day that converges over time. Or you can split the training week up to have a force day, “normal” day, and speed day.
Moral of the story - as long as you appreciate the underlying principles, you can organize the training however you want.2
While guidelines for this are more difficult than talking about strength or hypertrophy, you can’t go wrong with the following.
Importantly, the jumps and throws should take place at the beginning of a training session immediately after the warm-up because it’s imperative you are fresh for them to work.3
2️⃣ Programming Considerations for Sprints
There’s something majestic about watching world-class speed. Like Usain Bolt running a 9.58 100 meter or Chris Johnson running a 4.24 40 yard dash.
The thing with speed, though, is that it’s largely genetic. If you don’t have it in the cards to be fast, it won’t happen. There’s no such thing as making a slow person fast, but you can almost always make someone faster. And importantly, the inclusion of sprinting into a training program can significantly improve your rate of force development.
The principles concerning jumps and throws apply here as well. Progress sprints over time by manipulating force and velocity. That means:
Going short to long - beginning with an acceleration phase (force bias) and transitioning to a top-end speed phase (velocity bias)
Converging – doing short and long and converging over time.
Again, lots of options, but here’s an example of how you may progress over the course of a training cycle using a short to long approach:
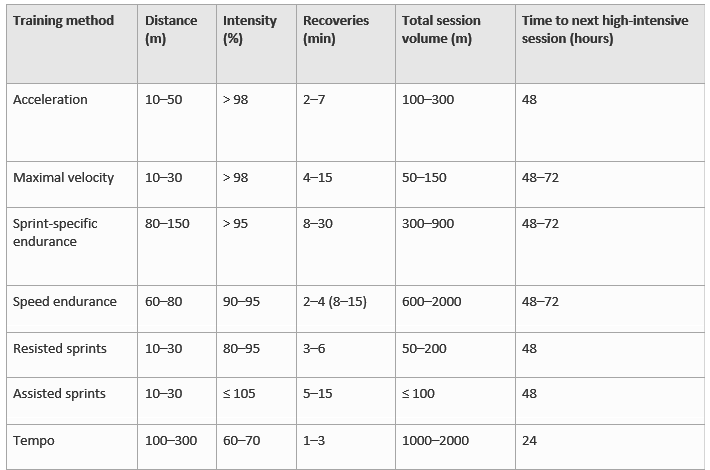
In terms of protocols, here’s an excellent overview from “The Training and Development of Elite Sprint Performance: an Integration of Scientific and Best Practice Literature” by Haugen et al.
Just remember that these recommendations are for high-level track athletes, which you are not. So, aim at the low end of the total session volume recommendations.
3️⃣ Programming Considerations for Max Velocity Lifts
The use of accommodating resistance (AR), such as bands and chains, is another way to develop power.
For accommodating resistance power training, the total load on the bar will fall anywhere between 30-80% of your 1 rep max.4 Generally speaking, the accommodating resistance needs to make up at least 15% of the total bar weight.
For example, if you have a 400lb squat max, and you want to work at 70% of your 1RM the load may look like:
The goal here is quality, quality, quality. This is not the place to grind through reps. The bar must move with a purpose and at “max” velocity for this method to work. That means reps per set will be low with ample rest periods and recovery time.
The typical set and rep structure would follow suit with the remainder of the power training guidelines outlined in this chapter: moderate to higher set count with a lower rep count.
Now, with accommodating resistance, the rest time is typically 30-120 seconds depending on the prescription. The lower the prescribed top-end weight (read: TOTAL weight on the bar, which is the sum of both the straight weight AND the AR), the shorter the rest and the higher the volume, and vice versa for higher top-end weight.
Here are some basic guidelines:
If you have a velocity-based training (VBT) device, then you can set velocity range goals with cut-offs to determine how many sets you hit. For example, you can do something like the following:
Sets: ?
Reps: 3
Rest: 60 sec
Velocity: 1.0-1.3 m/s
In this scenario, the athlete chooses a load that meets the velocity range and hit sets of 3 every 60 seconds until the velocity falls below the acceptable range (less than 1.0m/s in this example).5
Closing Thoughts
Being powerful is, without question, one of the greatest feelings in the world.
Ripping weight off the floor, sprinting, jumping, and throwing turns heads. Period.
As a LifeProof Athlete, you must dial it up and do the same. Go become the love child of both force (Juggernaut) and velocity (Flash).
While this chapter is a bare-bones overview of a complex topic, the guidelines and protocols I’ve outlined work. They worked when I started using them 10 years ago and they still work today.
Yes, you can look at complex and contrast training methods.
Yes, you can utilize velocity-based training at a much higher level.
Yes, you can bucket athletes as kangaroos or gorillas to get them a more individualized power training protocol.
But for the majority of people, that’ll lead to more confusion and fewer results.
One of my goals with this book is to remove as much noise as possible so you can focus on the signal.
In other words - stick to the basics and milk them for everything they are worth before you worry about more advanced protocols.
I promise you you have A LOT of gainz left in the tank from higher-level execution of the basics.
Finally - if you learned 1 thing from reading this, can I ask you to do me a favor and share it with just 1 friend or family member that will find it useful? It won’t take you longer than 10 seconds to share, and it’d truly mean the world to me.
Much love.
James
My projects (if you’re interested…)
🦍 The silverback training project – this is an exclusive 16-week training and nutrition coaching program for men that want to look better, feel better and perform better than ever before.
🤑 The wealthy fit pro – this is an exclusive 6-week coaching program for fitness professionals that want to get more clients and make an extra $1000-5000 per month online.
🏋️ Principles of strength and conditioning course – this is where I show you how to empower your own performance by teaching you to write training programs that get record results in record time for your physique, health, and performance.
💨 The oxygen course – this is a course for those brave souls that want to dive into the weeds and learn graduate-level respiratory, cardiovascular, and muscular physiology without the graduate school price tag.
There are levels to this. A better, yet more complicated approach, is to fill whatever bucket the athlete is missing. This requires testing to see if the athlete is force-biased or velocity biased, and then giving them what they don’t have.
I generally treat greater load (force bias) as more extensive and less load (velocity bias) as more intensive.
You will see this in the training day design chapter.
The total load is the sum of the weight on the bar plus the amount of band/chain tension.
Velocity-based training is a world unto itself. For more on that, I recommend this resource.


