
How to Rapidly Improve Your Movement and Mobility to Elevate Your Performance and Recovery
Your step-by-step guide to train hard, fast and heavy without feeling like a dumpster fire

Admittedly, this movement chapter was by far the hardest to write in this book. What to include? What not to include? How much depth should we really get into? Are we bastardizing something that deserves more attention? Should we talk about inhaled skeletons, exhaled skeletons, nutation, counter-nutation, concentric vs. eccentric orientation, and so on and so forth?
And I believe the difficulty arises because human movement is so complex. Much more complex and nuanced than everything else we’ve discussed in this book. In addition, movement gets tribalistic with people flaunting their favorite 3 letter acronym and going to war over who’s right and who’s wrong. Even though most everyone is saying similar things just in different ways.
These concerns led me to re-write this chapter on at least 3 separate occasions and ultimately, I decided it best to follow the overall theme of this book and keep it as actionable as possible. While this chapter is by no means perfect, and at times uses language that is a little too absolutist for my comfort levels, I do believe it gets the point across succinctly and successfully.
Before we get started, I need to reiterate one important point: this movement chapter (and the rest of this book) is focused on building well-rounded, robust, life-proof athletes. In other words, we are focusing on the middle of the bell curve, and not the outliers (i.e. people who are in pain and people who want to specialize).

The reason I bring this up is because you need to know your boundaries. Pain and highly specialized performance require a level of detail we simply cannot and will not get into in this book.
With that out of the way, let’s begin our movement conversation with a big buzzword: posture.
There is no such thing as “good” posture
I’m not sure where the concept of “good” vs. “bad” posture originated, but I’d like for you to know there is no such thing.
And that’s because posture is relative and incredibly context-dependent.
For example, if you have to run away from a lion, the posture that you would use there should be different than the posture that you would assume if you're going to:
Walk
Lunge
Squat
Press
Pull
Run
Jump
Cut
Sit down and eat dinner with your family
Lay on the couch
Etc.
So, “good” posture is not chest up, shoulders back, stand tall, don’t slouch, look like you are standing at attention in the military…
“Good” posture is fluid, it is dynamic and it is variable. In other words, it has the ability to change.
“Bad” posture, on the other hand, lacks the ability to change and that’s when people (maybe even you) get themselves in trouble and can’t seem to train hard without feeling like a rusty old broken-down refrigerator.
So, our goal in this movement section is simple: give you the tools needed to build a fluid, dynamic, and variable skeleton, so you can train hard, fast, and heavy without being in pain.
And in order to make that happen, you will need to execute the following 4 key movement principles.
Movement Principle 1: The Stack is King
The most important core concept when trying to improve human movement is the stack, and when we talk about the stack, we are talking about your ability to set the position of a rib cage and pelvis.
If you think of your rib cage and pelvis like a mouth, you want a closed mouth with ribs down (ribs are the top of the mouth) and pelvis tucked under (pelvis is the bottom of the mouth). You do not want an open mouth with ribs flying up and a pelvis dumping forward.
Let’s draw this out to make sure we’re on the same page:

On the left is a strong stack position with the ribs down and pelvis tucked under. This is exactly the position you want to be in. On the right, is the position you want to avoid: ribs are flaring up and the pelvis is dumping forward.
Note the difference in shape as well. On the left, you have created a strong cylinder position where you aren’t overly opened or closed on the back (posterior) or front (anterior) side. On the right, you see a very different story. You are excessively opened on the front AND excessively closed off on the back.
You can see the same presentation in the picture below:

Where the person on the left is failing to get in a strong stack position, but the person on the right is crushing it.
The reason the stack is so important, and why I have it placed as principle #1, is that it lays the foundation for:
Allowing your arms and legs to work – without proper rib and pelvic positioning, your limbs are fighting a losing battle because last time I checked, your legs attach to your pelvis and your arms (humerus and scapula) work off your ribs.
Allowing you to move through all three planes of motion (sagittal, frontal, transverse) – if you can’t control flexion and extension, you’ll never be able to move side to side or rotate.
Optimizing respiration – in order for your diaphragm to drive respiration, it must attain a strong domed position to descend from. If your ribs are flared up and out, this will not happen, and a host of negative downstream consequences occur.
In other words, it is THE foundation for human movement and without it, you are playing with fire.
We have over 50 years of collective experience here at Silverback, and we can tell you without fail that the stack continues to be the single most important focal point when we bring on new athletes because it drastically changes how they feel and perform.
Athletes that can get a strong stack position, experience massive results while feeling better than ever before.
Athletes that can’t get in a strong stack position, typically have a hard time training more than 2-3 weeks without something hurting.
Now, each of the above bullet points can easily be turned into their own book, but better understanding them will not change the action you need to take which is to always prioritize setting the stack position.
Movement rule 1: the stack is king. You will set it for every exercise, and you will pull the plug on any exercise that you cannot get in OR maintain the stack for.1
Before we move on, let’s walk through three quick applied examples of our “the stack is king” rule:
Applied Example 1: Pressing Overhead
Let me be blunt – if you don’t have access to range of motion on a table then you will never be able to magically reclaim it when thrown under load.
And a perfect example of that is the overhead press.
Here’s a quick and dirty way to assess whether or not you should be pressing overhead…
Stand up with your back against a wall and slowly raise your arms overhead until your thumbs touch the wall behind you. I want you to stop reading and do this. Got it? Good. Now do it again following these exact instructions, and if you can’t perform any of the steps you are immediately disqualified.
Stand with your back against the wall.
Think about tucking your belt buckle to your belly button. As you do this, you should feel your low back press into the wall.
Exhale your ribs down and feel the rest of your back press into the wall. At this point, I shouldn’t be able to slide my hand anywhere between your back and the wall.
Press the back of your head into the wall while still looking straight ahead.
Start with your arms at your sides and slowly raise them overhead without any part of your back or head coming off the wall. If either one does, then the test is over. If they don’t, then you may continue raising your arms overhead until your thumbs touch the wall.
How did that version of the test go? Did you pass? My guess is you performed version 1 without any issues but couldn’t reach the wall in version 2 because I forced you to maintain the stack (note: it’s important for you to learn what the stack “breaking” feels like so you can catch yourself)
Knowing that true overhead work isn’t an option for you, does not mean you cannot utilize other incline and pseudo overhead pressing variations…as long as you keep to the golden rule of maintaining the stack.
Notice how this exercise really stacks the deck in your favor (pun intended) and makes it easy for you to get the position you want of ribs down and pelvis under.
This is a solid exercise choice and one that you can move ahead with.
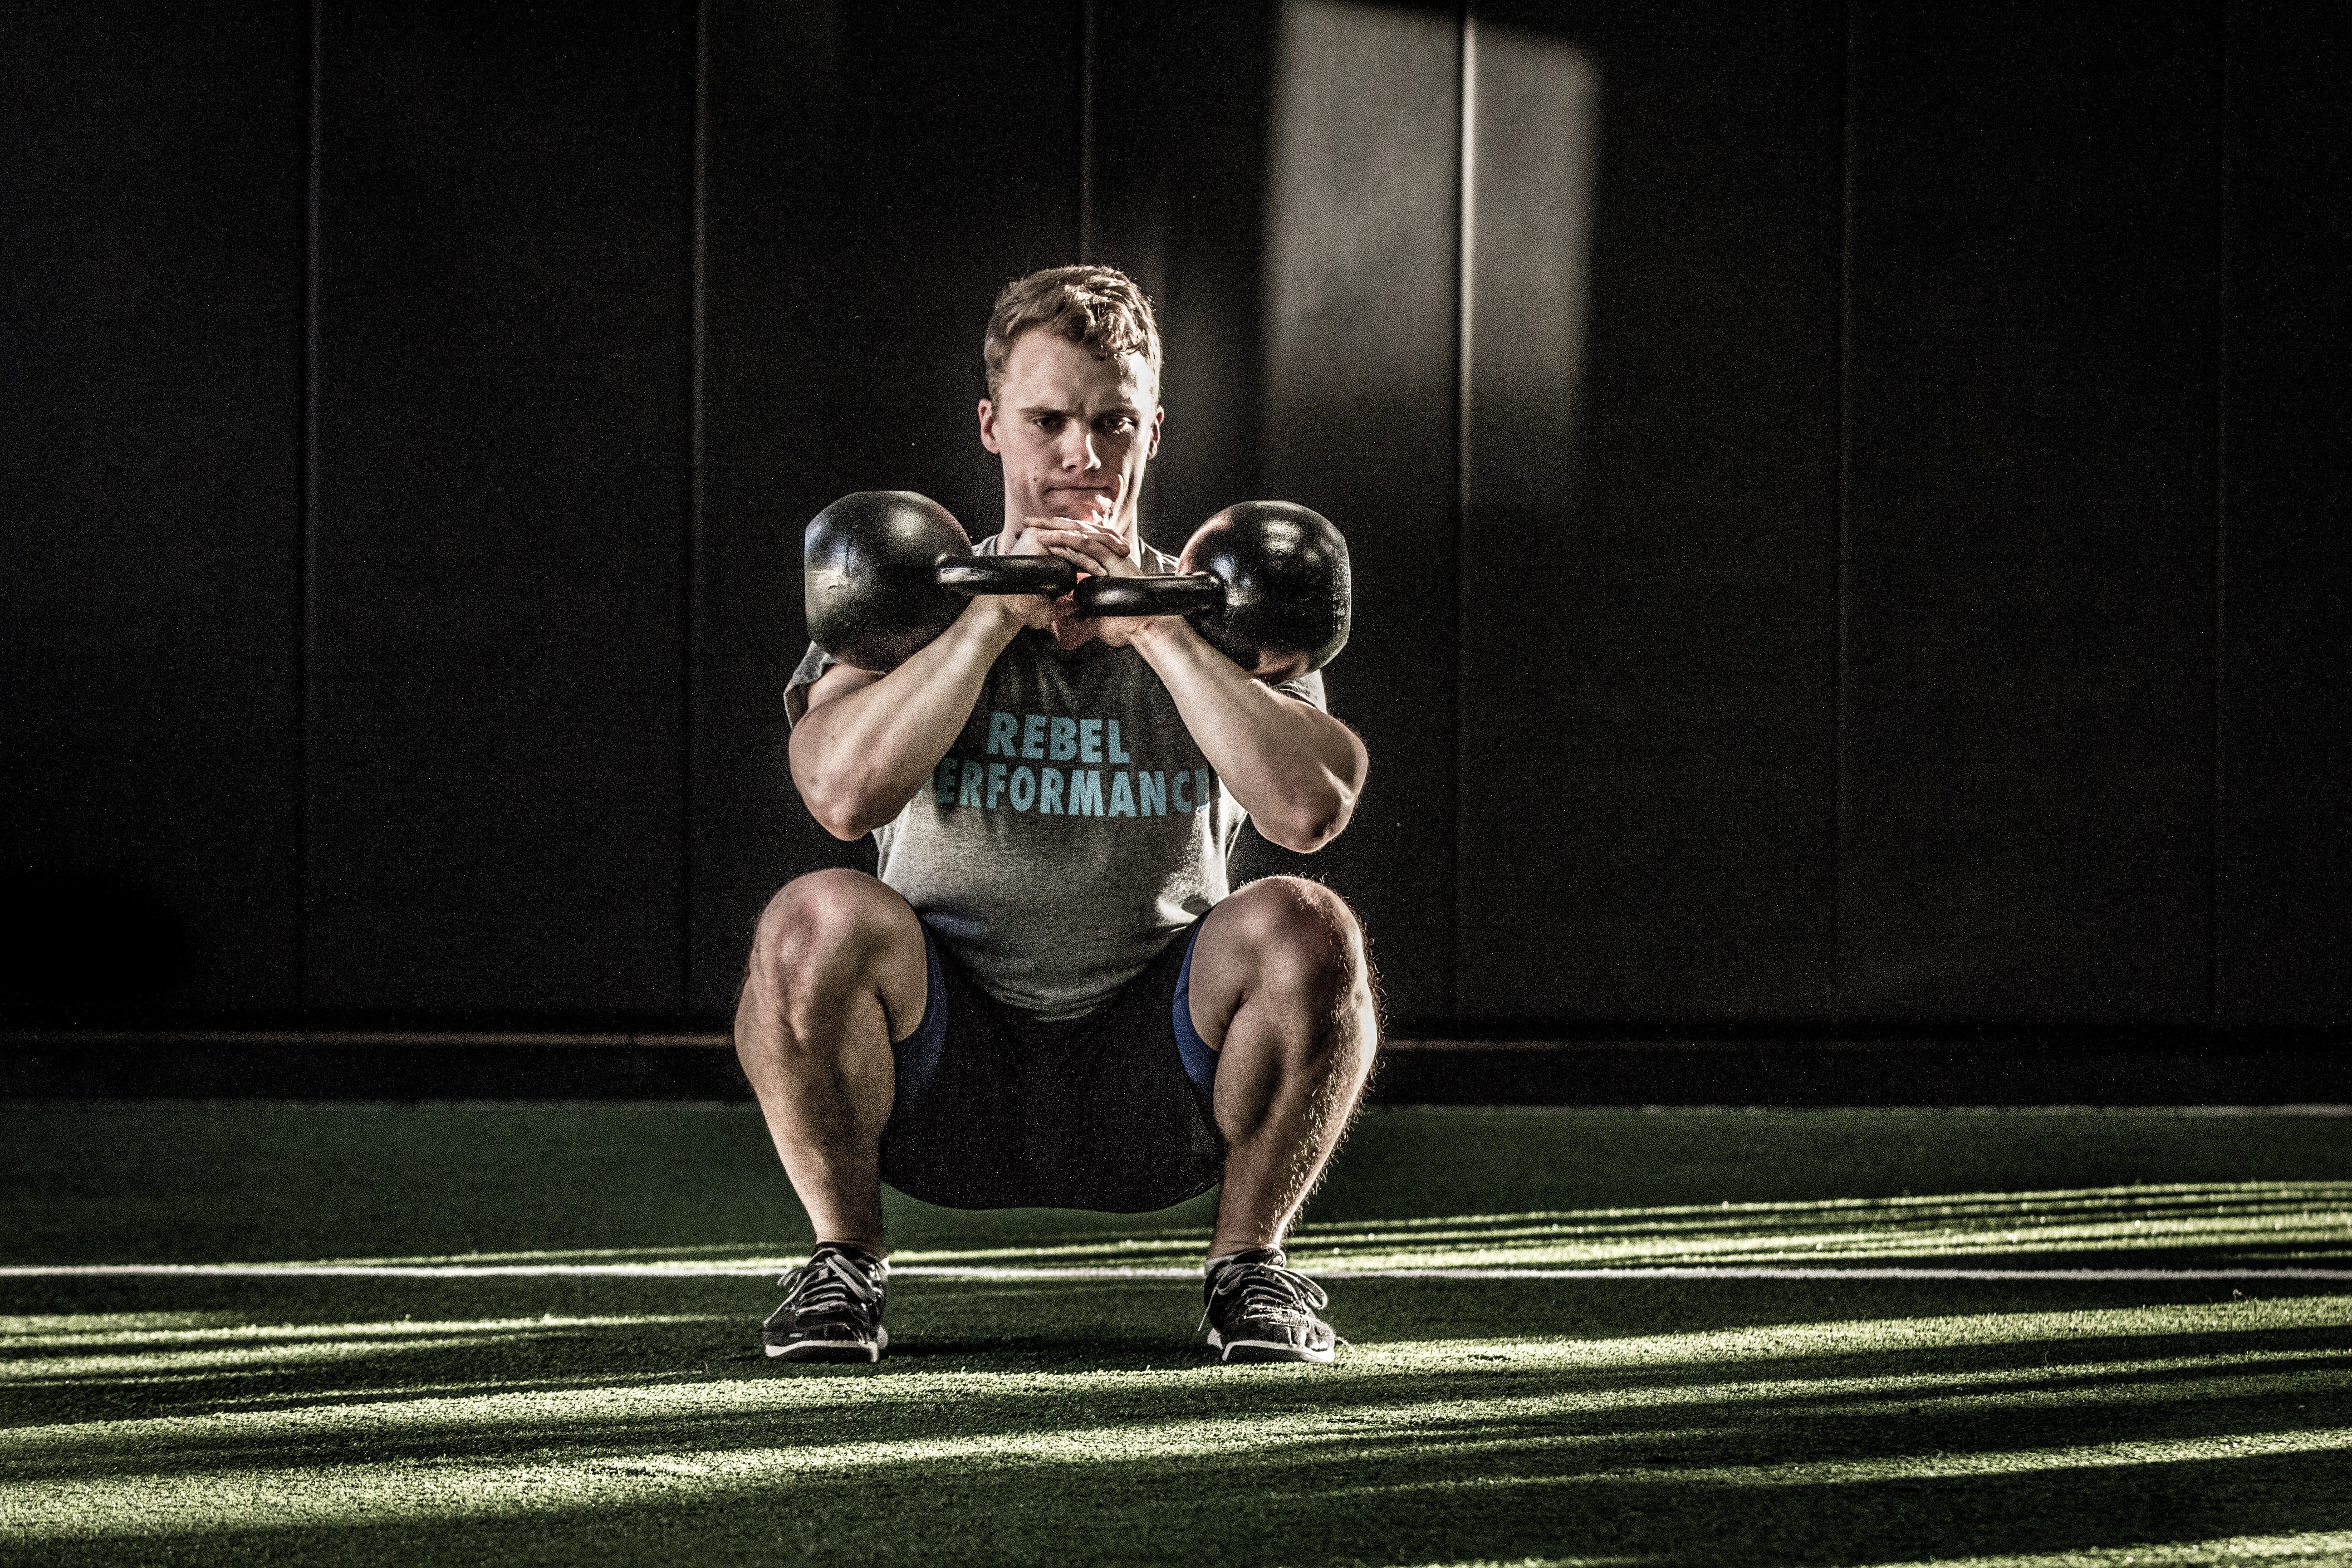
Applied Example 2: Barbell Back Squat
The barbell back squat has a storied history in strength and conditioning due to its roots in powerlifting, but it’s simply not a great movement option for people that don’t have any interest in competing in powerlifting.
Let me bring back the same picture from before to drive home my point:

The individual on the left is set up for a barbell back squat but notice how the act of bringing your arms behind your center of gravity inherently flares your ribs up and dumps your pelvis forward making it REALLY difficult to maintain a stack.
Compare this to the individual on the right who is set up for a barbell front squat. By bringing your hands in front of your body, you naturally drive your ribs down and pelvis under.
So, what is a better squat variation??
Pretty much any squat variation that brings your hands in front of your body! Things like a barbell front squat, safety bar squat, or spider bar squat are great options because 1) they make it easier to maintain a stack and 2) they can get you the same strength, hypertrophy, and power adaptations as a back squat.
That sounds like a win-win to me.
Movement Principle 2: Move Through All The Patterns and Stances
To quote Albert Einstein, “everything should be made as simple as possible, but no simpler.” And that aptly sums up my philosophy when it comes to movement.
You can take movement down many different rabbit holes and get crazy in-depth with table tests, infrasternal angles, infrapubic angles, inhaled skeletons, exhaled skeletons, and assessments, but at the end of the day, I think this confuses far more people than it helps.
Especially when a simple strategy like “move through all the patterns and stances” (paired with rule #1 the stack is king) tends to 1) cover all your bases, 2) deliver devastating results and 3) keep you feeling like a well-oiled machine.
If it doesn’t work for you, then yes, you need to dig deeper, but I can tell you that it has worked repeatedly for us here at Silverback.
So, don’t make something more complicated than it needs to be.
Plus, you are here for a training effect! You aren’t here to lie around on foam rollers and be a professional warm-upper. This is why it’s so important to be able to bake movement change into your actual training program, and the next two sections on patterns and stances will do just that for you.
The Patterns
There are 4 major patterns, squat, hinge, upper push, and upper pull, that we can place on two spectrums.
Let’s start with our squat-to-hinge spectrum.

A true squat is characterized by vertical displacement of the pelvis with knees tracking out over the toes, while a true hinge is characterized by horizontal displacement of the pelvis with knees not moving or shifting slightly posteriorly.
In a squat, you have femurs moving on a stable pelvis, while in a hinge you have a pelvis moving on stable femurs.
And in terms of what you’ll be feeling, squats bring more quads, adductors, and glutes to the table while a hinge brings more hamstrings and glutes.
With that as your framework, you should be able to place exercises, both unilateral and bilateral variations, along the spectrum as being squattier or hingier.
For example, an RDL is the hingiest thing you can do, a well-executed front squat is probably the squattiest thing you can do, and a traditional low bar back squat, as you see in powerlifting, is far more of a hinge than a squat.
Next up is our upper push to upper pull spectrum.
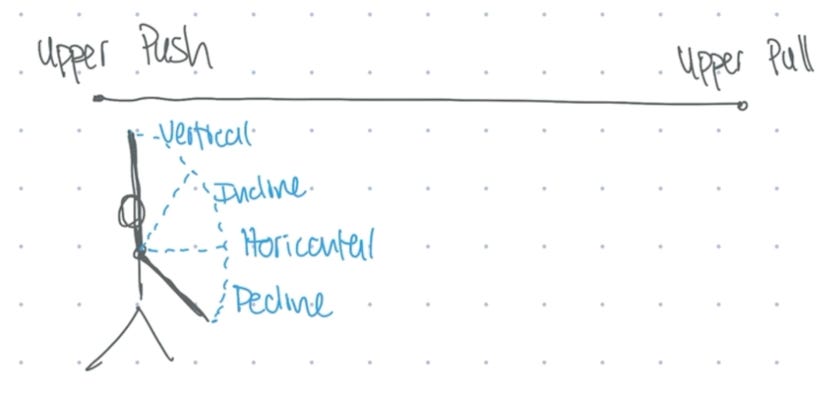
As you can see, this spectrum can be broken down further by vertical, incline, horizontal, or decline variations. Here are some examples:
Upper push vertical – dumbbell push press
Upper push incline – incline DB bench press
Upper push horizontal – push up
Upper push decline – decline DB bench press
Upper pull vertical – pull up
Upper pull incline – half kneeling 1 arm lat pulldown
Upper pull horizontal – 1 arm DB row
Upper pull decline – split stance 1 arm low cable row
Now, unlike our squat-to-hinge spectrum, where what’s moving on what changes, our upper push-to-upper pull spectrum is characterized by shoulder blades moving on stable ribs (hopefully this stable ribs thing sounds familiar…cough…stack…cough).
Here’s an easy way to think of this: ribs function like the floor for your shoulder blades, and if you try to walk without a floor, bad things happen.
Equally bad is when you lock your shoulder blade and don’t allow it to move (unless you are doing a competitive powerlifting style bench press) because shoulder health is a love fest between your ribs, your humerus, and your shoulder blade, and you need all 3 on board.
Where you do see a difference is in the direction the shoulder blade moves during the concentric portion of the exercise:
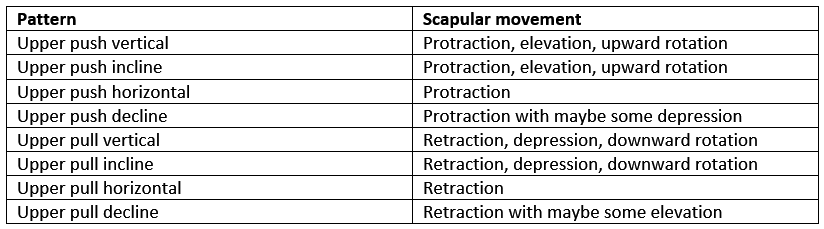
In terms of what you’ll be feeling, an upper push generally targets your pecs, triceps, anterior delts, and serratus anterior, while an upper pull targets your lats, rear delts, and rhomboids (there’s obviously more going on here, but those are the big guns).
One critical point that needs to be addressed is that this spectrum contains a danger zone (the area shaded in red below):

The reason this exists as a danger zone is that 98% of people do not have access to this range of motion. I’ve performed hundreds of table tests in my career, and can hardly remember a dozen people that have full shoulder flexion (you experienced a rough version of this when you performed the back-to-wall shoulder flexion test earlier).
This means true vertical pushing and pulling are likely off the table for most folks because there’s NO WAY they can do it correctly. If they don’t have it passively on a table, there’s a 0% chance they will magically reclaim it under load. Instead, they will compensate their way through the movement and be playing with fire (this is where we see a lot of anterior shoulder impingements from the humeral head banging into the long head of the bicep).
This isn’t complicated stuff, but you’d be amazed how often people don’t work across these spectrums and patterns and get stuck doing the same thing all the time (and then wonder why they feel like an old rusty refrigerator).
Remember our goal here – to build a fluid, dynamic, variable skeleton that performs at a high level AND feels good while doing so.
And one of the ways you make that happen is by working through these patterns and spectrums and not becoming a one-trick pony.
Now, to put the icing on the cake, let’s talk about the 10 different stances you can train these patterns in.
The Stances
The patterns and spectrums become far more powerful when you blend them with the different stances at your disposal. This is by no means a comprehensive list, but these 10 stances integrated with the 4 patterns will allow you to bake high-quality movement change into your training program:
Bilateral
Unilateral
Half kneeling
Tall kneeling
Split stance
Lateral stance
Short seated
Long seated
90-90
Hook lying
I want to quickly hit on a BIG point: just moving across the 4 patterns without considering your stance will hurt you in the long run.
And the #1 place where that becomes true is with the bilateral stance.
Whenever we onboard new athletes who complain of not being able to separate pain and performance, one of the most common characteristics of the training programs they have been doing is that they are only getting exposed to bilateral exercises.
For example, when I left college, I was a broken-down athlete. I had had two stress fractures in my back and felt like poop all the time. Did my performance improve? Yes. But that performance improvement doesn’t mean anything if you aren’t healthy.
Here’s what my typical training looked like in college: barbell back squat, hang clean, barbell bench press, some bilateral upper pull, and then we’d occasionally hit a lunge or unilateral upper pull.
So, my exposure across the patterns looked like this:
Squat (yes)
Hinge (no)
Upper push vertical (no)
Upper push incline (no)
Upper push horizontal (yes)
Upper push decline (no)
Upper pull vertical (no)
Upper pull incline (no)
Upper pull horizontal (yes)
Upper pull decline (no)
And my exposure across the stances looked like this:
Bilateral (yes)
Unilateral (I’ll give this .5 credit)
Half kneeling (no)
Tall kneeling (no)
Split stance (no)
Lateral stance (no)
Short seated (no)
Long seated (no)
90-90 (no)
Hook lying (no)
If you think about all the possible combinations that exist between the patterns and stances, I was MAYBE getting exposed to 10% of them. That’s no bueno.
Here are two other examples of where this routinely goes wrong:
Powerlifting – lives mostly bilateral, horizontal and very rarely does a true squat (a low bar back squat is a glorified hinge)
CrossFit – lives mostly bilateral with A LOT of vertical (remember, vertical is a danger zone because the vast majority of people don’t have full shoulder flexion).
This is one of the reasons we get a lot of athletes coming from these two sports who are broken down and in pain.
So, the moral of the story is simple, do not limit your exposure.2
Movement rule 2: DO NOT LIMIT EXPOSURE. Work across the 4 patterns and different stances.
Movement Principle 3: Exercise Classification
Sensory–Intensity Spectrum
We can place exercises on a spectrum that run from intensity on one extreme to sensory on the other extreme.
And we can use variables such as load, velocity, tempo, stance, feel, and outcome to help characterize where exercises fall on the spectrum. Like this:

Note how load is the easiest way to distinguish the two extremes. As load increases, you shift to the output side of the spectrum. While as load decrease, you shift to the sensory side of the spectrum.
Also, note the difference in outcome goals. Sensory exercises are about creating movement/positional change, while output exercises are all about increasing performance metrics like strength, hypertrophy, and/or power.
Here’s another table to help you with the distinction between the two extremes:
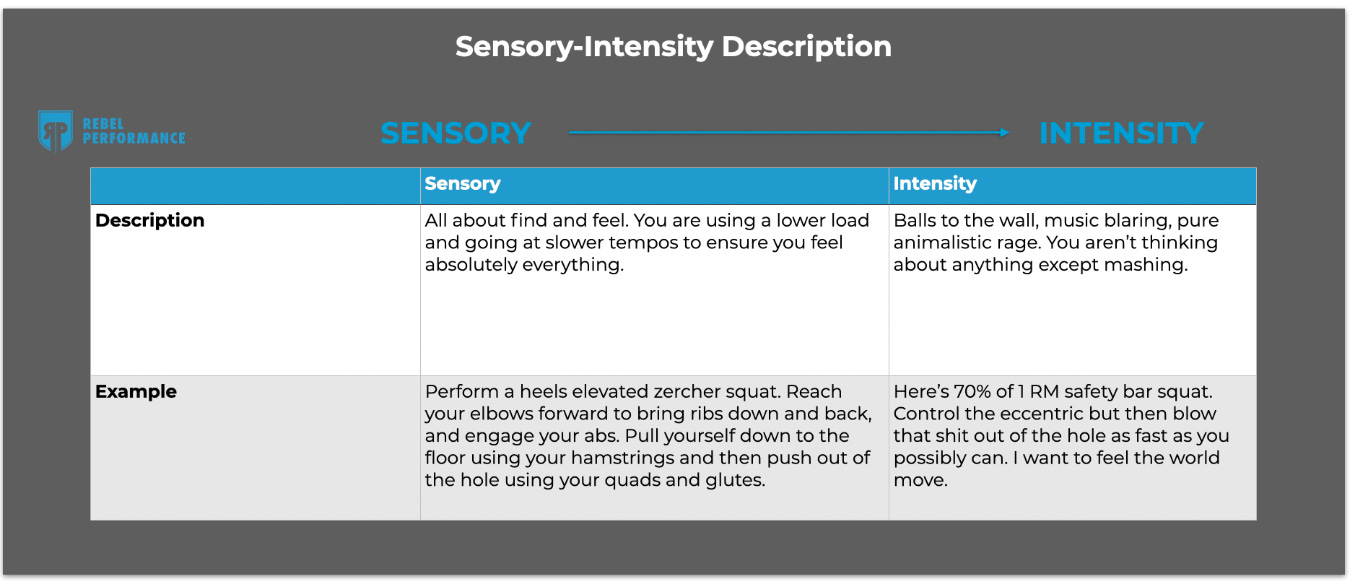
Pay particular attention to the example portion in the above table.
Notice how the exercises are coached and cued vastly differently?
The sensory exercise is very technique oriented with an emphasis being placed on finding and feeling abs, hamstrings, quads, and glutes. If it was an upper-body exercise, the emphasis may be on feeling abs, pecs, and triceps. The point is the same regardless: sensory exercises are all about FEELING.
The output exercise, on the other hand, doesn’t mention any specific muscle groups. It’s all about generating as much force and velocity as possible, and when that’s your focus, you won’t be able to feel specific muscle groups. You’ll feel everything.
Now, while you have nearly limitless options for placing exercises on the spectrum, here’s a basic example to get you started.

Note how bigger, bilateral movements (i.e. where load and velocity are highest) fall toward the output side, while smaller, unilateral movements (i.e. where load and velocity are lowest) fall toward the sensory side.
It’s important to consider that the same exercise can move across the spectrum purely based on how you decide to load, coach, and cue it.
Just think back to the example descriptions of sensory and output exercises. I could easily cue the SSB squat like I did the Zercher squat, thus shifting it toward the sensory side of the spectrum.
Again, you have LOTS of options here. Just focus on understanding the PRINCIPAL of the matter and everything else becomes easy.
Exercise Selection
Let’s take a sneak peek into choosing exercises on a training day.
We’ll hammer this much more when we get to the programming section, but it’s important to touch on this now for clarity.
The watered-down version of our training day template looks like this (again, we will unpack this in far greater detail when we get to the programming section):
Block 1 - Prep
Block 2 - Power
Block 3 - Main lift
Block 4 - Accessory
Notice how the day is broken into blocks.
There’s a prep block, power block, main lift block, and accessories block.
All you have to do is ask yourself one simple question – do you want that block to be more output biased or more sensory-biased?
And I’m going to make that decision really easy for you.
First, your prep block is your warmup, so it’s always sensory.
Second, your power block will begin extensive and become more intensive over the course of a training program (go here if you need a refresher on extensive vs intensive)3
Third, your main lift block is ALWAYS output. Let me repeat that: your main lift block is ALWAYS output. Which means you are dialing up load and/or velocity. This is not the place to be a kind human being. This is animalistic rage mode. This is go time. So, make sure you pick something that allows that to take place, and it will almost always be a bilateral movement. The only time I’ve used a unilateral movement here is when I have baseball players hit really heavy SSB reverse lunges (I’m talking 400lbs for 2/side).
Fourth, your accessory exercises will begin on the sensory side of the spectrum and move toward the output side of the spectrum over the course of a training program. This is where you are looking to drive more positional and movement-based changes. Unilateral movements go really well here as well as varying stances (things like half kneeling, tall kneeling, short seated, etc.).
A helpful way to think about this accessory block, and sensory exercises in general, is like you are plugging a leaky hose…
I want you to think of the amount of water that comes out the end of the hose as your ability to generate force. Obviously, when the hose is full of nicks you are leaking water out along the hose and so your total water content (force generation) coming out the end of the hose will be diminished.
The sensory work will help plug those holes, thus increasing the amount of water that comes out the end of the hose allowing you to generate more force and experience improvements in performance.
I like to think about the relationship between your main lift and accessory block as a flywheel effect with the sensory work plugging the hose allowing you to get more out of your main lift (where you are driving the majority of your performance improvement).
This may seem like a lot, but we’ll get more reps with it in the programming section.
For now, let’s sum this up:
Prep: always sensory
Power: extensive (sensory) to intensive (output) over time
Example starting point: extensive unilateral hop
Main lift: always output
Example: safety bar squat
Accessory: sensory to output over time
Example starting point: front foot elevated goblet split squat
Movement rule 3: your main lift will always be an output movement and your accessories will move from sensory à output over the course of a training program.
Movement Principle 4: Outcomes > Implements
The final movement principle I’d like to hammer into your head is that you need to be married to outcomes not implements.
Because the outcome (strength, hypertrophy, power, endurance, movement) matters far more than the implement used to generate the outcome.
The implement is merely a tool, and your goal should be to choose the best tool for the job based on the previously discussed 3 rules:
Stack is king
Move across all patterns and stances
Your main lift will always be an output movement and your accessories will move from sensory to output over the course of a training program.
With a special emphasis on rule 1: the stack is king.
For example, many people love barbells, and I think that’s great, but far too many of those people are married to barbells.
If you don’t compete in a sport that forces you to use a barbell, then who the hell cares if you use a barbell in training??
All that matters is the outcome…
For example, a safety bar squat or hack squat is just as effective at building strength and/or hypertrophy AND makes it easier to maintain a strong stack position.
So, why not use the implement/tool that delivers the same outcome AND lends itself to better movement? Hopefully, the answer to that is obvious.
Movement rule 4: be married to outcomes, not implements.
Movement Training Guidelines Summary
Movement rule 1: the stack is king. You will set it for every exercise, and you will pull the plug on any exercise that you cannot get in OR maintain the stack for.
Movement rule 2: DO NOT LIMIT EXPOSURE. Work across the 4 patterns and different stances.
Movement rule 3: your main lift will always be an output movement and your accessories will move from sensory à output over the course of a training program.
Movement rule 4: be married to outcomes, not implements.
The only caveat to our stack rule is if you compete in a sport that makes it nearly impossible to attain that position. A good example could be a competition-style low bar back squat in powerlifting. It’s going to be very difficult to get this position right during that movement, but that’s the nature of sport. If you’re chasing the highest total possible, then you must learn to operate and manage the fringes of acceptability.
The only caveat to this rule is if you want to specialize and become world-class at a specific sport/skill. In these cases, you will intentionally limit exposure to increase performance and accept that you are playing with some fire. You have to know the rules to break the rules
We are going to put extensive in the same category as sensory, and intensive in the same category as output.
Fantastic article. Organization is really helpful, even for the parts I already knew.
Two questions about shoulder flexion: Like the 98%, I am many inches away from the wall.
1. Pullups? I can use a hollow body hold (impossible for an overhead barbell press), which gets me a bit closer to a canister position. Does that help enough?
2. One arm overhead? E.g. kb press or TGU (standing position)? This lets me slightly twist my body so less pressure on the shoulder.